Setup for Jupyter in Python
UPDATE 2020-11-24: Added a section to describe how to use batch files/aliases with jupyter
For most of my courses at SUAS, Python is the main programming/scripting language to use. This blog post is intended to serve as a tutorial for my students and all other interested. This tutorial does not provide a lot of insights on “why?”, it should one only guide through the installation process to a working environment with a Jupyter notebook.
Feedback is very welcome and appreciated. Just send me a mail on the mail address shown in the footer.
Installation of the Python Interpreter
Windows
The first thing you need is the python interpreter itself. Go to the download page of python.org and download an appropriate version. At the time of writing this post, I prefer using python 3.8.
Attention: do not download and install Python 2.X! Python2 is end-of-life and differs significantly, also in syntax and functionality, from the state-of-the-art Python3.X.
When starting the installer, you are asked how to install the interpreter. Before choosing the installation mode, check the Add Python 3.X to PATH.
Next, you are asked what optional features to install. Here check at least pip and td/tk and IDLE. The rest is up to you.
The advanced options offer additional options. Here, check the checkbox Add Python to environment variables. Then you can proceed to the installation.
Linux
This is highly dependent on the Linux distribution and the version. If you are a *NIX user, you know to install stuff anyway. 🙂
OSX
Sorry, I am not a Mac user and therefore I have no experience or idea on how to install anything… 🙈
Verify installation
To verify, if you installed python correctly, open a terminal. Under windows enter press the windows key and enter cmd+enter.
When the command line is open, enter python. You should see something like:

In this window, you can see the version of the python interpreter.
If the command line prompts an error, where it is said, that the program or executable python could not be found, make sure that the path to the python interpreter was put to the environment variables and/or to the PATH. (you can close the Python interpreter using either CTRL+D or by typing in exit())
Setup of a Python Environment
Note: in this tutorial pip and virtualenv are used. This is a personal preference, without any deeper reason. Alternatively, conda or miniconda can be used as well.
A Python Environment can be considered as a virtual container, in which all packages are installed, that are installed when the environment is activated. The environment is just a folder with the installed components and a dedicated interpreter in there. You will see how this is structured at the end of this section.
To install virtualenv, the application managing the environment for us, we also use the command line. For installation, simply call
pip install virtualenv
pip is our python package manager. With this application nearly every library or package can be downloaded.
Then, using cd, navigate with the command line to the directory, where you want your project files to be in. E.g. cd C:/Users/Martin/FH/DSP/Lab. In that directory, create a virtual environment, calling
virtualenv .venv
where .venv is the name of the virtual environment. The leading . indicates a hidden directory, so we are not visually distracted when browsing through the folder (just a convenience thing). The folder structure of a virtual environment in windows looks like the following:
.venv
+-- etc/
+-- Lib/
|   +-- ...
+-- Scripts/
|   +-- activate
|   +-- activate.bat
+-- share/
|   +-- ...
+-- pyvenv.cfg
For the moment, only the Scripts/ folder is necessary for us. To start the virtual environment, browse to this folder (e.g. by cd .venv and cd Scripts) and activate the environment by calling the activate.bat (simply type the name in the command line and execute).
Under Linux, the structure looks a bit different. There the activation script is stored in .venv/bin and is called using ./activate.
Hint for Linux users: create an aliased, that automatically create and activate your environment, something like the following (put those lines into your .bashrc or a config file that is called by that);
alias mkvenv='virtualenv .venv'
alias venv='source .venv/bin/activate'
In both cases (Windows and Linux), you must have noticed a change in the prompt. Leading, the name of the environment in brackets should be displayed:

When activated the environment, return to the folder by executing cd .. twice. Now, you are in your project folder again. This is the place where you should download the notebooks to.
Installation of additional packages
As already mentioned in the section above, we are using pip as our package manager. To install packages, simply call pip install <package>.
To install the initially necessary packages for our courses, simply call the following:
pip install jupyter
If this is not working, pip needs to be called as a module from python:
python -m pip install jupyter
Other dependencies that are needed throughout my courses are then installed using the provided notebooks.
Jupyter Notebooks
Jupyter notebooks can be compared and are similar to Matlab’s live scripts. They contain live code, equations, visualizations, and narrative text.
With the already installed packages, you have two ways of using notebooks: either with Jupyter Lab or as a single notebook. Jupyter Lab offers more features like an IDE and is (to the most extend) compatible with the single notebook. To start Jupyter Lab, simply start
jupyter lab
For the notebook only version, use
jupyter notebook
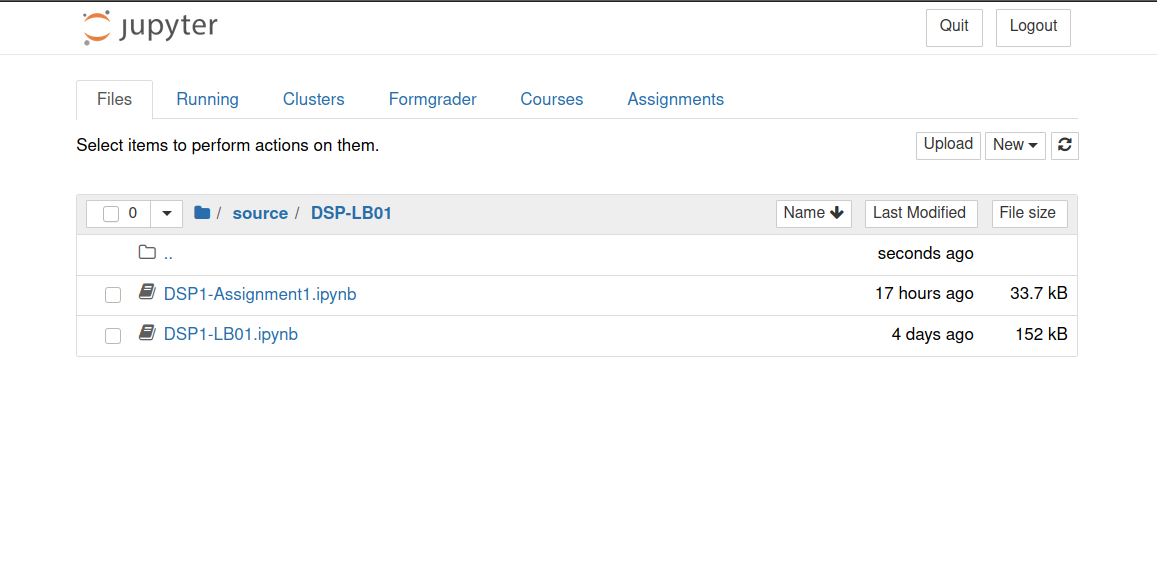
For both cases, a web server will be started. Normally a browser should pop up. If not, you will see an URL displayed. Copy and paste that URL into your browser. The started notebook webserver should then look similar to the following

Help! I do not want to use the terminal all the time
For some this is quite anoying: one always has to start the terminal, navigate to the directory, start the environment, …
In order to avoid this stupid repeating process, one could simply create some helper functions! In the following, depending on the OS, different methods are illustrated.
Linux
First of all, on Linux, one is very likely to use the command line. The following aliases need to be put into the .bash_aliases file of the user’s home directory.
$ cat ~/.bash_aliases
alias mkvenv='virtualenv .venv'
alias venv='source .venv/bin/activate'
alias jupyterinstall='~/config_directory/jupyter_install.sh'
The first of those three commands simply creates a new virtual environment with the name .venv in the current directory. Then, using the command venv (no period here), one can activate the virtual environment in the current directory (if one is present). The third one specifies a call to a bash file. In this bash file, one could put all necessary dependencies and packages to install. An exemplary implementation could be:
$ cat ~/config_directory/jupyter_install.sh
pip install jupyter==1.0.0
pip install jupyterlab==2.2.9
The last one may be helpfull if one has to create environments with jupyter repeatedly.
Windows
On Windows, the command line (at least in the opinion of the author) is not as easy to use and intuitive as in Linux. Hence one could create batch scripts to activate the environments.
An exemplary batch file is shown below. In this case, this file is located in the directory where the environment is located.
D:
cd D:\Users\me\SUAS\DL\.venv\Scripts
call activate.bat
cd D:\Users\me\SUAS\DL
call jupyter notebook
pause
This batch file does the same, as one would do on the command line. It changes the directory to the Script location of the used virtual environment, calls the activate.bat script, changes to the root directory of the project, and starts the jupyter notebook. The pause forces popped up the terminal to be present till it is closed by the user.
For further convenience, a shortcut to this file can be put on the Desktop. This desktop can then be modified by setting an icon of choice.

PyCharm IDE
If you don’t really like working in a browser and you like the convenience of a well optimized IDE, I recommend you install PyCharm. For working notebooks, the community edition (the free version) is not sufficient anymore. For this, the commercial Pro version needs to be downloaded. Lucky you (at least if you are a student), PyCharm offers free Edu-licences. Simply go to the PyCharm website and create an account. There you can request the Edu-licence. When installing the Professional version you need to enter your credentials to be able to use those features.
In PyCharm you then have a side-by-side view with code (looks like a section python script) and the live converter and rendered notebook. For more information on notebooks in PyCharm please visit this link.
A further very convenient asset, is that PyCharm handles the environments for you, as well as the package handling. For more information on this, please be referred to the official docs.